
TL;DR:
- Accurate measurement of space and delivery routes is essential for fitting bespoke furniture precisely. Proper documentation and verification, including detailed spec sheets and physical templates, prevent costly errors and delays. Thorough planning and communication ensure furniture fits challenging spaces and aligns with design and accessibility needs.
Specifying custom fitted furniture dimensions is the process of recording every measurement your space and delivery route require before a single piece of wood is cut. Get it right and your made-to-measure furniture slots in cleanly, uses every centimetre of available space, and looks as though it was always there. Get it wrong and you face costly remakes, delivery failures, or gaps that undermine the whole design. This guide walks you through the tools, documentation, and verification steps that professional designers use, so your tailored furniture dimensions are accurate from the first measurement to the final installation.
What tools and measurements do you need to specify custom furniture dimensions?
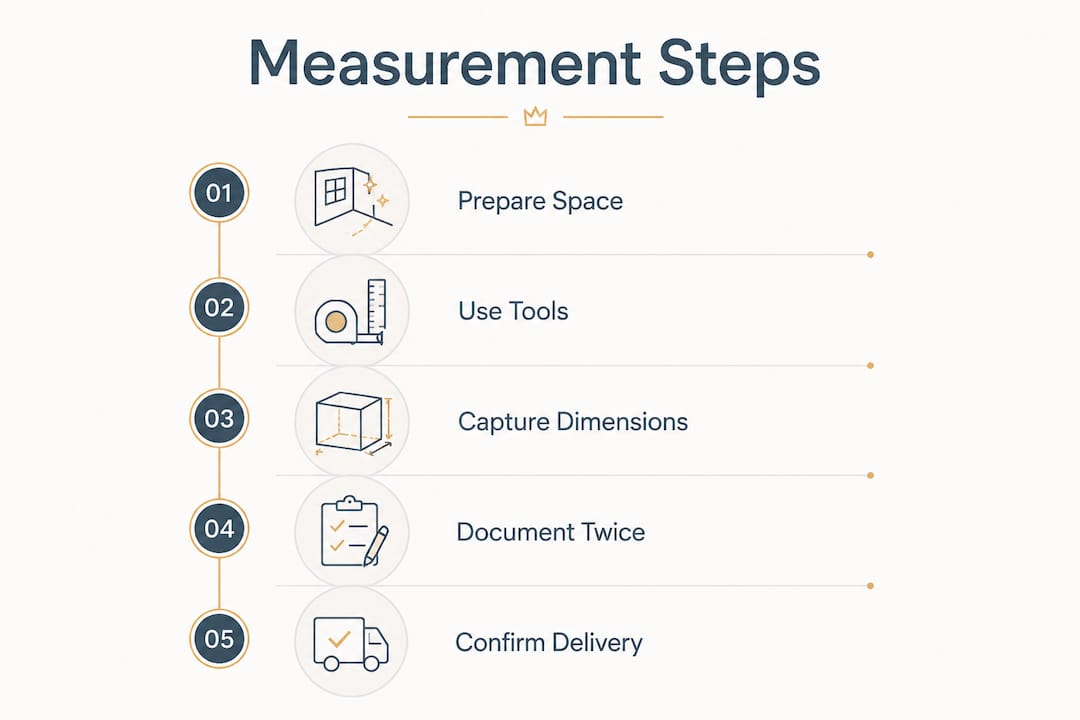
Accurate fitted furniture measurements begin with the right tools. A steel tape measure handles most room dimensions reliably. A laser distance measurer speeds up longer runs and reduces parallax error. A spirit level or tripod level confirms whether floors and walls are truly plumb, which matters far more than most homeowners expect.

Capture six core dimensions for every fitted piece: width, height, depth, and the three diagonal measurements that reveal whether a room is truly square. Measure width and height at three points each (top, middle, and bottom for height; left, centre, and right for width). Use the smallest reading as your working figure. This protects against walls that bow inward or floors that rise toward the centre of a room.
Delivery pathway dimensions are just as critical as room dimensions. Measure every door opening, corridor width, stair width, and ceiling height along the route the furniture will travel. Stair measurements are particularly important in older terraced properties where stairwells narrow at the turn.
| Dimension to capture | Tool | Why it matters |
|---|---|---|
| Room width (3 points) | Steel tape or laser measure | Walls are rarely parallel |
| Room height (3 points) | Steel tape or laser measure | Floors and ceilings slope |
| Depth of recess or alcove | Steel tape | Determines maximum furniture depth |
| Door opening width and height | Steel tape | Confirms delivery access |
| Stair width at narrowest point | Steel tape | Flags diagonal depth risk |
| Floor level across room | Spirit level | Reveals need for adjustable feet |
Pro Tip: Measure every critical dimension at least twice on separate visits. Rooms behave differently when empty versus furnished, and a second visit often reveals a radiator pipe or skirting board you missed the first time.
How do you document and communicate your furniture dimension requirements?
A vague spec sheet is the primary cause of production errors in custom furniture manufacturing. Every dimension, material choice, hardware type, and finish detail belongs in a written specification before you approve anything for production.
A complete spec sheet for made-to-measure furniture should include:
- Exact dimensions with width, height, and depth recorded in millimetres, not centimetres or inches, to eliminate conversion errors.
- Material specifications covering board type (MDF, plywood, or solid timber), veneer species, and thickness.
- Hardware details including hinge type, drawer runner grade, handle style, and soft-close requirements.
- Finish specification with paint reference codes (RAL or British Standard), sheen level, and number of coats.
- Unique item codes for each piece so manufacturers, delivery teams, and installers all reference the same component.
- Installation notes flagging any known challenges such as a sloping ceiling, a gas pipe behind the wall, or a narrow doorway on the delivery route.
Physical material samples, known in the trade as strike-offs, verify how a fabric or stain reads under your actual room lighting before mass production begins. Colour under a showroom's LED strip looks entirely different from colour under a north-facing bedroom window. Request samples and view them in situ before signing off.
Pro Tip: Ask your manufacturer for both 2D and 3D shop drawings before production approval. A 2D drawing confirms dimensions; a 3D rendering reveals whether the proportions feel right in the room.
What measurements ensure your furniture fits challenging spaces and delivery routes?
Narrow stairwells and tight hallways are the most common reason a perfectly made piece of furniture cannot reach its destination. Measuring the delivery pathway in full, including every turn and ceiling height change, prevents this entirely avoidable problem.
Diagonal depth: the calculation that saves deliveries
The diagonal depth formula is the most underused tool in customised furniture planning. When a sofa or tall cabinet must navigate a 90-degree stairwell turn, the relevant measurement is not its width or height alone. The diagonal depth is calculated as √(depth² + height²). A sofa with a depth of 40 inches and a height of 34 inches has a diagonal depth of approximately 52.5 inches. If your stairwell clearance at the turn is less than that figure, the piece will not pass without disassembly.
Measuring walls for fitted wardrobes and alcove units
Walls in British homes, particularly Victorian and Edwardian terraces, are rarely straight. Measure at the top, middle, and bottom of every wall that a fitted unit will touch, then use the smallest measurement as your working width. A wall variance greater than 20mm requires filler panels or scribing strips to close the gap cleanly. Adjustable feet handle uneven floors and allow the unit to sit level even when the floor slopes by several millimetres across its run.
| Delivery obstacle | Measurement to take | Adjustment strategy |
|---|---|---|
| Narrow front door | Clear opening width and height | Design furniture in sections for reassembly |
| 90-degree stair turn | Diagonal clearance at turn | Apply diagonal depth formula; consider flat-pack delivery |
| Low ceiling on stair landing | Ceiling height at lowest point | Reduce furniture height or tilt angle on delivery |
| Bowed or out-of-square wall | Width at top, middle, and bottom | Use filler panels or scribing strips |
| Uneven floor | Level reading across full run | Specify adjustable feet with 20–40mm range |
For corner fitted wardrobes in particular, measuring the diagonal of the corner recess is non-negotiable. An unrecorded 15mm difference between the two walls of a corner can throw the entire unit out of alignment.
How do you incorporate design, ergonomics, and accessibility into furniture dimensions?
Dimensions are not only about fit. They also determine whether a piece of furniture is comfortable and safe to use every day. The Americans with Disabilities Act (ADA) provides the most widely referenced accessibility benchmarks in furniture design, even for private residential projects. ADA guidelines specify a maximum desk height of 34 inches and a minimum knee clearance of 27 inches. These figures translate directly into practical comfort for anyone who works or sits at a fitted desk for extended periods.
Ergonomic and accessibility dimension guidelines for common fitted furniture:
- Wardrobe hanging rails: Primary rail at 1,700–1,800mm from floor for full-length garments; secondary rail at 900–1,000mm for folded or shorter items.
- Desk height: 720–740mm for seated work; 900–1,050mm for standing desk configurations.
- Drawer depth: 150mm for shallow trays; 300mm for deep filing drawers.
- Shelf spacing: 300mm minimum for paperbacks; 400mm for A4 folders; 500mm for large display objects.
- Handle and hardware placement: Position handles at 900–1,200mm from floor for comfortable reach without bending.
- Toe kick depth: 75–100mm allows the user to stand close to a unit without stubbing their feet.
Ceiling height shapes the visual weight of a piece as much as its actual dimensions. A floor-to-ceiling wardrobe in a room with 2,400mm ceilings feels proportionate and draws the eye upward. The same unit in a room with 2,200mm ceilings can feel oppressive if the cornice detail is not scaled down to match. Always consider the room's proportions when finalising the overall height of any fitted piece.
Material choices also feed into dimension decisions. A 22mm MDF board takes up more space than an 18mm plywood panel. In a narrow alcove, that 4mm difference per side reduces internal width by 8mm, which can affect whether a standard coat hanger fits on the rail.
What are common pitfalls and how do you verify dimensions before ordering?
The single most common mistake in designing custom furniture is relying on one set of measurements taken before old furniture is removed. Skirting boards, radiator pipes, and wall plugs hidden behind existing units regularly alter the true available space. Final site measurement after the room is cleared is the only reliable baseline.
The cardboard test is a practical verification step that professional furniture designers recommend. Cut cardboard templates to the proposed footprint and height of each piece, then live with them in position for two or three days. You will quickly notice if a wardrobe door swing blocks a light switch, or if a cabinet depth makes the room feel narrow when you walk through it. Cardboard templates cost nothing and prevent expensive remakes.
Prototype approval and on-site fitting verification matter for complex or multi-unit installations. Request a dry-fit of the first unit before the remainder are installed. This reveals any discrepancy between the spec sheet and the actual space while adjustments are still straightforward.
Pro Tip: Send your measurement documentation to both the manufacturer and the installation team separately, and ask each to flag any concerns before production begins. Two sets of expert eyes catch errors that one set misses.
Key takeaways
Accurate fitted furniture dimensions require measuring both the target space and the full delivery route, then documenting every detail in a formal spec sheet before production begins.
| Point | Details |
|---|---|
| Measure in three places | Take width and height at top, middle, and bottom; use the smallest figure as your working dimension. |
| Calculate diagonal depth | Use √(depth² + height²) to confirm large pieces can navigate stairwell turns before ordering. |
| Write a detailed spec sheet | Include exact dimensions, materials, hardware, finish codes, and item codes to prevent production errors. |
| Request physical samples | View fabric and stain strike-offs under your actual room lighting before approving production. |
| Verify with cardboard templates | Live with proposed dimensions for two to three days before finalising your order. |
What I have learned from over 1,000 fitted furniture projects
After completing more than 1,000 bespoke furniture installations across London and the surrounding areas, the pattern is consistent. The projects that go smoothly share one thing: the homeowner or their designer measured the delivery route before measuring the room. The projects that hit trouble almost always skipped that step.
Urban homes present particular challenges. Victorian terraces with narrow hallways, low stair landings, and walls that lean by 10–15mm over their full height are the norm, not the exception. A wardrobe that fits perfectly in the bedroom can be impossible to deliver if nobody checked the stair turn clearance. That is a painful and expensive lesson to learn on installation day.
The other consistent finding is that communication between the homeowner, the manufacturer, and the installation team breaks down around vague language. "Dark wood" is not a specification. "Oak veneer in Smoked finish, 18mm board, satin lacquer" is. The more specific your written requirements, the fewer surprises arrive with the delivery van.
Balancing precision with design aspiration is the real skill. You might want floor-to-ceiling shelving, but if your ceiling slopes from 2,400mm to 2,150mm across the room, a fixed-height unit will leave a visible gap at one end. The answer is a stepped design or a scribed cornice, not a compromise on height. Knowing your measurements in full gives you the information to make that call confidently, rather than discovering the problem on site.
— Bravo
Bespoke fitted furniture built to your exact measurements
Getting the measurements right is the foundation. The next step is working with a manufacturer who builds to those measurements without rounding, approximating, or substituting materials.
Bravo London manufactures bespoke fitted furniture to your exact specifications, from floor-to-ceiling wardrobes to alcove units in rooms that no standard product will touch. Every project includes expert measurement guidance, detailed spec sheet review, and full installation support. With over 1,000 completed projects and a 10-year warranty, Bravo London brings the same level of care to a single fitted wardrobe as to a whole-home joinery scheme. You can also explore the full range of fitted wardrobe options to find the right configuration for your space.
FAQ
What dimensions do I need to specify for a fitted wardrobe?
Measure the width at three heights, the height at three widths, and the depth of the recess. Always use the smallest reading as your working figure to account for wall irregularities.
How do I check whether large furniture will fit up my stairs?
Calculate the diagonal depth using √(depth² + height²) and compare it against the stair turn clearance. If the diagonal depth exceeds the clearance, the piece needs to be delivered in sections.
What should a custom furniture spec sheet include?
A spec sheet must cover exact dimensions, materials, hardware, and finish details for every component, plus unique item codes and any installation notes about access challenges.
When should I take the final measurements for a custom furniture order?
Take final measurements after all existing furniture has been removed from the room. Floors, walls, and skirting boards hidden behind old units often change the available dimensions.
What is the cardboard test in furniture planning?
The cardboard test involves cutting templates to the proposed size of each piece and placing them in the room for several days. It reveals scale and flow issues before production begins, at no cost.